Pages

Wednesday, July 27, 2011

Lemon curd and strawberry buttermilk scones

Its the end of July and summer has finally decided to show its face here in Scotland. I've been spending my days off on the beach, eating ice cream and... making lemon curd and scones. Not even this weather can deter me when i get an idea in my head!


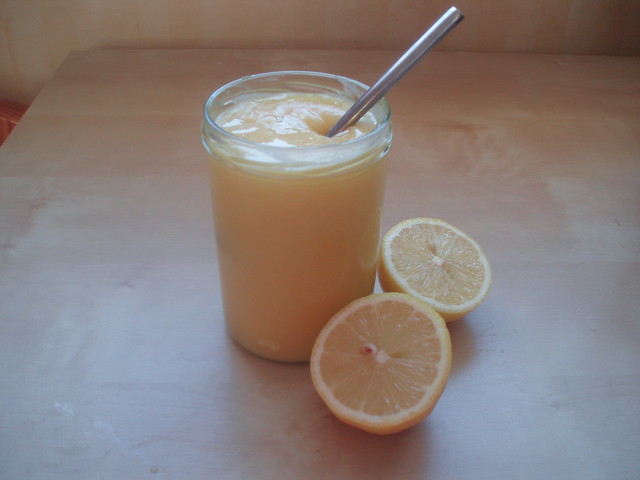
I made the lemon curd at the weekend after I accidentally came home with a rather large bag of lemons...

It came out beautifully though I'd never made it before and despite a brief spell where I was sure I was going to end up with lemon syrup instead of curd. Very rich, sweet and buttery.


And here's the recipe:

225g sugar
Zest and juice of 3 lemons
5 egg yolks
300g cold unsalted butter, cut into cubes


Makes 550g of curd.


Put sugar, zest, juice and egg yolks into a heatproof bowl and set above a pan of just simmering water. Stir constantly for ten minutes. Start adding the butter a few cubes at a time until its all incorporated. At this point, the curd should have thickened to a creamy consistency. Don't overheat or the eggs will scramble! 


Strain through a sieve to get rid of the zest and spoon into your jars before sealing tightly.


Just a note on the recipe here, the cooking time was estimated at 15 minutes but it took my curd around 25 minutes to thicken up so don't give up hope too soon!


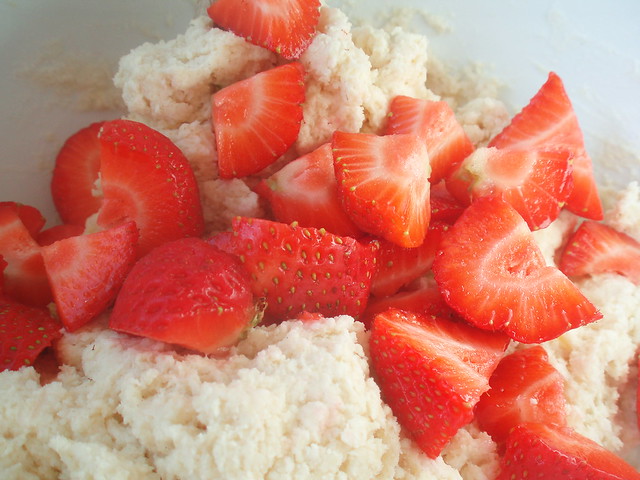
And of course i couldn't resist making something to put the curd on. I originally thought of sultana scones but with Scottish strawberries being in season it seemed rude not to make strawberry scones instead! These ones were made with buttermilk, something I've never used in a scone recipe before. The finished product wasn't as sweet as I would have liked but with a generous smear of lemon curd they were just right and they counteracted the intense sweet citrus of the curd well.


240g self-raising flour
2 tsp baking powder
40g sugar
pinch of salt
60g cold butter, cubed
175ml buttermilk
100g strawberries
1 egg yolk for brushing


makes 8.


Preheat oven to 170c/gas mark 3 and line a tray with baking paper.


Sift flour and put in a bowl with the sugar and baking powder. Add the butter and mix with your fingers or a fork until it takes on the consistency of rough sand. Add the buttermilk and mix well before adding the strawberries.


Roll out the dough onto your work surface, sprinkling with flour to stop it sticking until it is roughly a few centimetres thick and then cut into circles. Brush over the egg yolk and place on the baking tray. Bake for 20-25 minutes or until golden brown and cooked through.


Right, I'm back off outside to enjoy the sunshine before it disappears again!

Friday, July 22, 2011

Poppy seed and cream cheese


This is a Rachel Allen recipe which I slightly adapted to satisfy a cream cheese craving I woke up with this morning. Am I the only one who walks around with blinkers on until I get what it is I crave?


One thing to note is with this recipe is when it asks you to create a shallow well in the centre of the cake tin before putting it into the oven; listen to those words! The well I created was a little too shallow which meant it peaked slightly.


Luckily of course the flavour isn't dented by my mistake and it was really, really delicious. The cake itself is  quite rich and moist. The original recipe called for a vanilla buttercream icing but I found the replacement of cream cheese icing complemented the cake very well. That said, a liberal coat of icing is probably ideal if you don't want to overwhelm tasters. Unless that taster is me, in which case, more is definitely more!


100g plain flour
150g unsalted butter
100g caster sugar
3 eggs, beaten
1 tsp baking powder
75g poppy seeds


Preheat oven to 170c/gas mark 3. Butter and line 20cm/8in cake tin.


Cream butter and sugar together before slowly adding in the eggs until fully incorporated. Sift the flour and baking powder and add them to your mixture. Finally, add the poppy seeds and stir until combined.


Spoon mixture into the cake tin and make a shallow well in the centre of the tin. Bake for 25-28 minutes or until cooked through.

Saturday, July 16, 2011

Raspberry and coconut weekends

This recipe was one I had bookmarked upon my first flick through British Baking written by Oliver Peyton of Peyton and Byrne. The book itself probably deserves its own post purely because of its amazing design. It is packed full of traditional British recipes and a few 'trendier' ones too, all bound together by lilac hardcovers. Notably the book does not feature the word 'cupcake' and instead reaches for that more traditional term 'fairy cake' to describe the little cakes. It was refreshing to read to say the least! It was this that spurred me on to actually make the raspberry and coconut cakes for myself.

I have to say, they came out perfectly. The tart raspberries melted into the cake and helped to balance out the sweetness of the coconut icing. A huge hit in my house last night and several requests from friends for deliveries!


If there are any left by this evening I'll be sneaking these in to the cinema when I see Harry Potter. I might be the only person who hasn't been yet!

100g unsalted butter
125g sugar
2 eggs
150g self-raising flour
30g desiccated coconut
60g natural yoghurt
200g raspberries


Preheat oven to 170c.


Cream sugar and butter together until fluffy then add the eggs one at a time. Sift the flour in alongside the coconut and yoghurt and mix until incorporated. Place two raspberries in each case and then fill with the batter. Bake for 15 minutes.


There was a recipe included in the book for the frosting but I chose not to follow it... oops. So I'm afraid I don't have an exact recipe for what I did other than to say I incorporated coconut milk and lessened the amount of butter into an otherwise standard buttercream recipe.

Friday, July 15, 2011

Keeping it simple

So what started off as a beautiful, sunny morning here in Ayrshire by afternoon had become a bit of a disappointment in the form of rain. I started work at 6am (who said working in a bakery was glamourous?) having seen the sun, I intented to make something light and meringue based tonight but when I left with an umbrella later on, cookies seemed like a far more suitable treat. And while I love to invent different cookie combinations as much as the next person, for me the classic chocolate chip cookie always hits the spot.


Fighting the urge to eat the cookie dough is something I'm still working on!

I made these cookies not too long ago but put them in our oven for fifteen minutes forgetting that it has a fan so they turned out crispy rather than chewy; which is my preferred cookie texture. This time I was a wee bit smarter and put them in for twelve minutes and the results were vastly improved.


The most obvious choice to pair these cookies is with is of course milk or a hot drink but if the weather does decide to perk up, a lemonade or maybe even an ice cold gin and tonic...?

170g plain flour
80g caster sugar
90g demerara sugar
140g salted butter
2 eggs
3/4 tsp bicarbonate of soda
1/4 tsp vanilla
As much chocolate as you wish!

Preheat oven to 180c.

Beat butter and sugars together, then add the eggs until well mixed in. Next, add in the sifted flour and bicarbonate of soda, vanilla and chocolate chips and mix to form the dough. Roll into 2-3 inch round balls and place on two trays. Bake for 12-15 minutes.